Nominal procedure
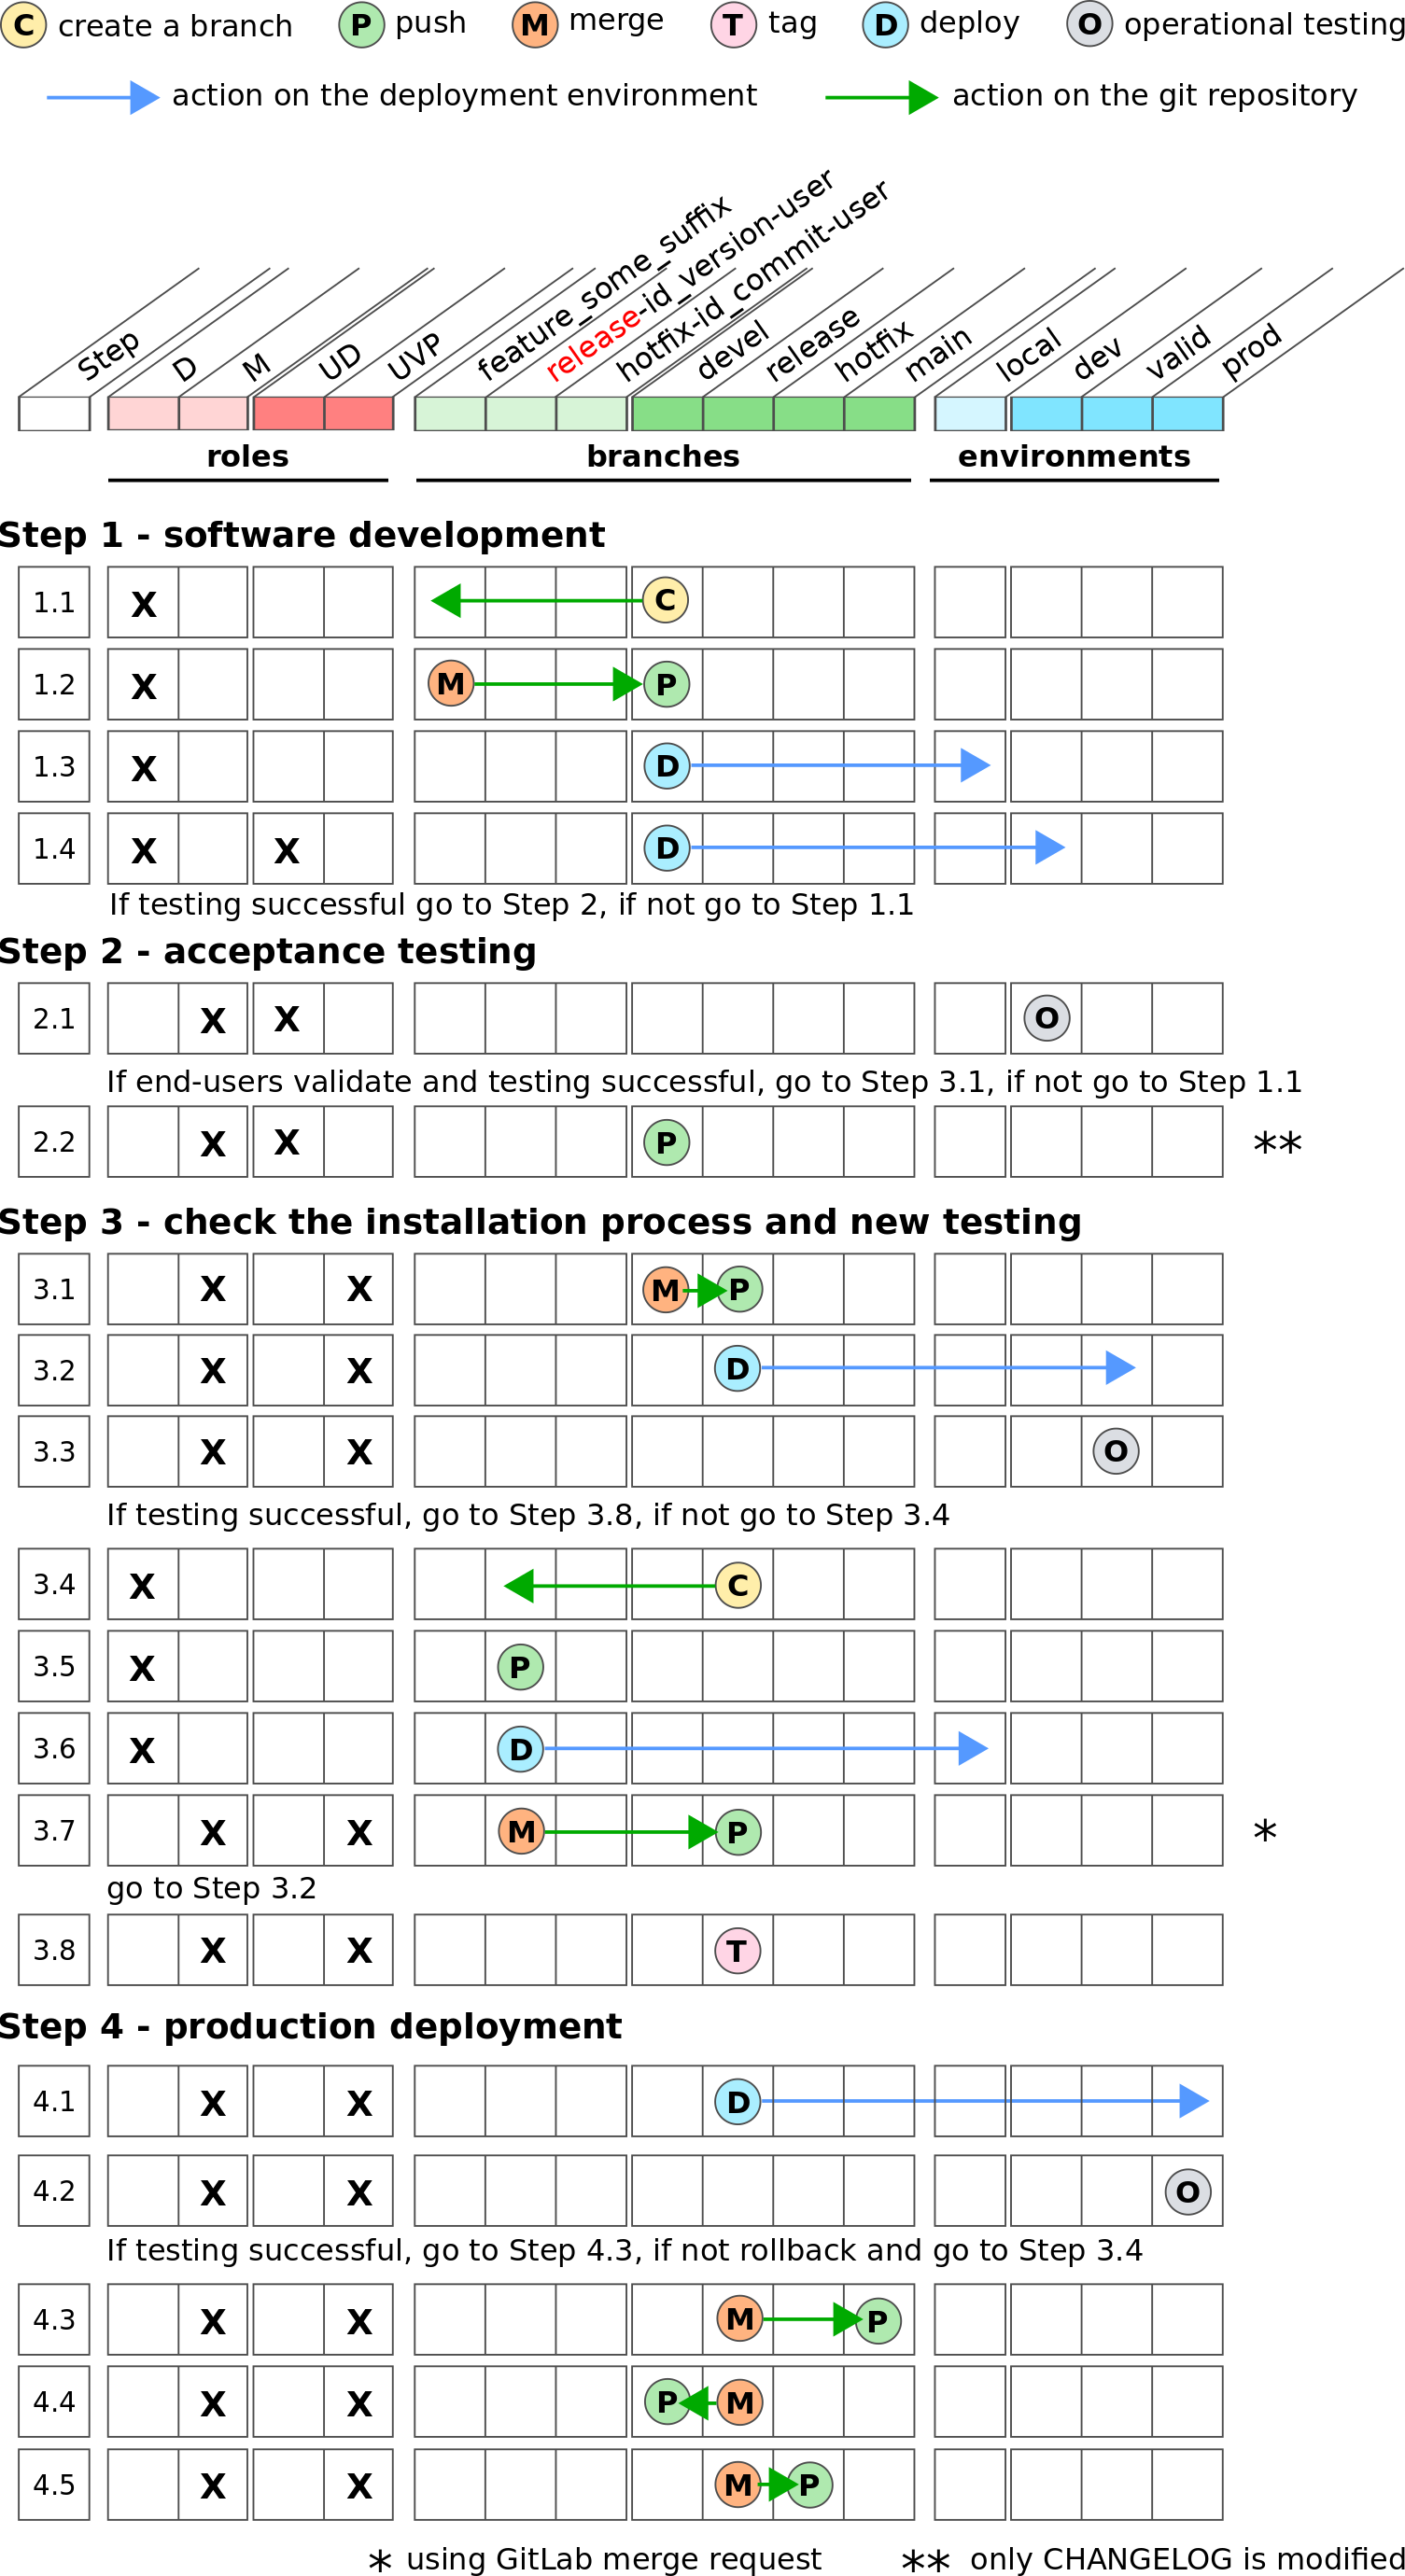
The section describes the first use case to develop a new release of the bioinformatics pipeline.
General overview
First we provide an overview of the development workflow in the nominal mode.
Step 1 - software development
The developer (D) reads the specifications of the new feature to be implemented in the GitLab issue or writes them in a new GitLab issue using the appropriate template.
The developer (D) creates a local branch named feature (it is recommended to give a meaningful name such feature_star_mapper) on the local workspace from the devel branch to implement the new expected functionalities, test the code, commit the modifications, merge them and push the code on the remote repository on the devel branch.
The developer (D) deploys the code from the devel branch either in a personal environment for testing or in the dev environment to perform unit, integration, system and regression testing.
The developer (D) checks that the expected functionalities have been correctly implemented.
If the testing is successful, it is possible to move to Step 2 - acceptance testing.
Step 2 - acceptance testing
The user (D+UD) creates a new GitLab issue with the label
 using the appropriate template. This GitLab issue allows the tracking of all the discussions with the end-users who will validate the new release.
The end-user can start the acceptance testing of the new release:
either, the end-user validates the new release,
or the end-user does not validate the new release. Thus, the developer (D) goes back to Step 1 - software development to implement the corrections until acceptance by the end-user.
The user (M+UVP) implements an operational testing in GitLab CI/CD.
The user (M+UVP) tracks the issues related to the new version in a Milestone
Step 3 - check the installation process and new testing
The user (M+UVP) brings the content of the devel branch into the release branch.
The user (M+UVP) creates a GitLab issue with the label
 using the appropriate template in order to track the different steps of the installation process. The ID of the GitLab issue opened for the of the release is also reported for tracking.
The user (M+UVP) deploys the code from the release branch in the valid environment.
The user (M+UVP) checks that the installation is successful.
The user (M+UVP) launches the operational testing in GitLab CI/CD.
Possibly, new corrections must be implemented on the release branch before the deployment in production. In this case:
The developer (D) creates a local branch names release-id_version-user from release branch. The id_version is the version number of the new release and the user is the unix login of the developer (e.g. release-version-1.2.3-phupe).
The developer (D) develops the corrections.
The developer (D) pushes the code from the local branch release-id_version-user on the remote repository.
The developer deploys the code from the release-id_version-user branch either in a personal environment for testing or in the dev environment to perform unit, integration, system and regression testing.
Once the code validated, the developer (D) has to Create a Merge Request in Gitlab from the release-id_version-user branch on the release branch. The Merge request is assigned to as user who has the Maintainer role.
The user (M+UVP) reviews and accepts the Merge Request.
Once all the testing successful, the user (M+UVP) adds a tag on the release branch with the new version number.
Step 4 - production deployment
Once validated by the end-user, the user (M+UVP) deploys the code in the prod environment from the release branch.
The user (M+UVP) schedules a periodic operational testing in GitLab CI/CD.
Once the deployment is successful, the user (M+UVP) brings the content of the release branch into the main branch for archiving.
The user (M+UVP) brings the content of the release branch into the hotfix branch.
If some modifications were committed on the release branch, the user (M+UVP) brings the content of the release branch into devel branch such that the corrections can be integrated in the future release. Note that possible conflicts may exist on some pieces of the code. They will have to be resolved before merging thus requiring the help from the other developers involved in the modifications.
If needed, the user (M+UVP) deploys the code from release branch in the dev environment, such that at this stage of the workflow, the same commit ID of the bioinformatics pipeline could be deployed in the dev, valid and prod environment.
The user (M+UVP) closes the GitLab issue
and the GitLab issue that were previously opened.The user (M+UVP) creates a new Release and closes the Milestone in GitLab.
Technical procedure
Step 1 - software development
New issue
The developer (D) reads the specifications of the new feature to be implemented in the GitLab issue or writes them in a new GitLab issue using the template
new_feature.
Code writing
The developer (D) clones the remote repository:
git clone git@gitlab.com:biogitflow/biogitflow-demo.git
The developer (D) enters the folder in the local workspace:
cd my_project
The developer (D) switches to the devel branch in the local workspace, gets the last modifications from the remote repository and checks that the right branch is used:
git checkout devel
git pull
git submodule update --init --recursive # if your git repo has submodules
git branch -vv
The developer (D) creates a local branch named feature (it is recommended to give a meaningful name such as feature_star_mapper) and uses it to implement the new expected feature:
git checkout -b feature
git branch -vv
The developer (D) implements the new feature.
The developer (D) tests the code (unit testing).
The developer (D) checks which files have been modified:
git status
The developer (D) specifies which files to be added in the staging area:
git add myScript.sh
The developer (D) commits the modifications with an explicit message using the Naming convention for the commit messages. The GitLab issue number is also reported in the commit message:
git commit -m "[MODIF] Sorting algorithm optimisation (Issue #11)"
Once the developments have been completed and committed on the local feature branch, the developer (D) switches to the devel branch:
git checkout devel
The developer (D) updates the local workspace with the remote repository:
git pull
git branch -vv
The developer (D) brings the content of the feature branch into the devel branch:
git merge feature
If needed, the developer (D) resolves the conflicts and checks that the code is still functional after the merge.
The developer (D) pushes the new version from the devel branch on the remote repository:
git push origin devel
The developer (D) deploys the code from the devel branch either in a personal environment for testing or in the dev environment to perform unit, integration, system and regression testing.
The developer (D) checks that the expected functionalities have been correctly implemented.
The developer (D) checks that all the modified files have been committed and pushed on the remote repository:
git status
The developer (D) deletes the local branch:
git branch -d feature
Deployment in the dev environment
The user (D+UD) deploys the bioinformatics pipeline in the dev environment from the devel branch using GitLab CI/CD (or ad-hoc deployment scripts using the commit ID to deploy).
Danger
Tags with version number are not used to deploy the code but only a commit ID. Indeed, a tag can be easily removed or moved in git thus it is not a reliable information for tracking. This is why commit ID are used for deployment.
At this stage, the current version under development, is deployed in /bioinfo/pipelines/foobar/dev and the file /bioinfo/pipelines/foobar/dev/version contains the commit ID that has been deployed.
Testing
The user (D+UD) performs unit, integration, system and regression testing. Other developers who implemented the new feature can contribute to validate all or part of the testing. If the testing is successful, we move to the Step 2 - acceptance testing, if not, we go back to the Step 1 - software development.
Step 2 - acceptance testing
Acceptance testing by end-users
The user (D+UD) creates a GitLab issue using the template
validation.The title of the GitLab issue must indicate the characteristics of the version to be validated.
The description in the GitLab issue lists the new features/modifications that have to be communicated to the end-users.
At the end of the description, a line such as fyi: @user1, @user2, @user3 is added such that all the persons involved in the validation process receive a notification.
The GitLab issue is labeled with
.The GitLab issue is assigned to a user (M+UVP).
The user (D+UD) or the user (M+UVP) sends an email to all the persons who are involved in the validation process.
The end-users can start the acceptance testing process:
either the end-users validate the new release,
or the end-users do not validate the new release. Then, the reason are tracked in the GitLab issue
that has been created. We go back to Step 1 - software development. The developer (D) develops the modifications requested by the end-users on a local feature branch derived from the devel branch. The process is iterated until the validation by the end-users. The same GitLab issue is used to track all the information during the validation process until the final validation.
Implement and launch the operational testing with GitLab CI/CD
The user (M+UD) checks that the deployment with GitLab CI/CD is available for the GitLab repository. It requires the file
.gitlab-ci.ymlas defined in the template pipeline.In the
.gitlab-ci.ymlfile, the operational testing is implemented through different jobs which launch the pipeline twice during the Deployment in the dev environment and compare the results to ensure they are identical.The user (M+UD) modifies (if needed) the script to compare the results (e.g.
optest/optest.sh).The user (M+UD) modifies (if needed) the test dataset used to launch the pipeline
If the operational testing fails (the bioinformatics pipeline does not work or is not reproducible), go back to the Step 1 - software development.
Update the CHANGELOG with the new version
Note
The CHANGELOG file provides a simple history of the different versions of the bioinformatics pipeline. The version numbers are listed by decreasing order.
A version number is added in the CHANGELOG using the following naming convention: version-x.y.z:
The z number is incremented for BUG FIXES of modifications which are not visible by the end-user
The x.y numbers are incremented for major modifications considered as SIGNIFICANT USER-VISIBLE CHANGES
Comments are added in the CHANGELOG to describe the most relevant functionalities added to the new release.
The CHANGELOG is divided into 3 sections:
NEW FEATURESSIGNIFICANT USER-VISIBLE CHANGESBUG FIXES
Example of CHANGELOG file:
version-1.2.1

    BUG FIXES
        [BUGFIX] segfault corrected

    NEW FEATURES
        [MODIF] optimization of the sort function
        [DOC] update of the end-user documentation

version-1.2.0

    NEW FEATURES
        [MODIF] use of GRCh38 reference genome
The user (M+UD) updates the devel branch to get the last modifications from the remote repository and checks that the right branch is used:
git checkout devel
git pull
git branch -vv
If needed, the user (M+UD) asks the other developers to define what comments should be added in the CHANGELOG and pushes the modifications on the remote repository:
git add CHANGELOG
git commit -m "[DOC] information about the version-1.2.3 added in the CHANGELOG"
git push origin devel
Track the issues related to the new version in a Milestone
As mentioned, a New issue is created whenever a new development is started. As new version encompasses several issues, it is important to track all the issues which have been considered in the new version. Therefore, the user (M+UD):
creates a new GitLab milestone with the same name as the new version number (e.g. version-x.y.z),
describes what is the purpose of the new GitLab milestone,
for each issue included in the new version, set the name of the GitLab milestone in the dedicated field.
Note
As your developments may depend on other GitLab repositories you maintain, you can also create another GitLab milestone in each of them and cross-referenced the milestones in the different repositories. To do so, you can just add in the field Description of the Milestone the URL of the other Milestones.
Step 3 - check the installation process and new testing
Bring the content of the devel branch into the release branch
The user (M+UVP) switches to release branch from the local workspace and updates it:
git checkout release
git status
git pull
git branch -vv
The user (M+UVP) brings the content of the devel branch into the release branch using the option
--no-ffto avoid the fast-forward mode. This option will produce a new commit ID with a specific message to describe and track the merge:
git merge --no-ff devel
The user (M+UVP) pushes the modifications from the release branch on the remote repository:
git push origin release
Create an issue to track the production deployment
The user (M+UVP) creates a GitLab issue using the template
deploy_in_prod:The GitLab issue is labeled with
.The GitLab issue is linked to the name of the GitLab milestone using the dedicated field.
The number of the GitLab issue opened with the label
along with the numbers of the other Issues that describe the new features of the new release are added for tracking in this new GitLab issue.The different steps of the deployment in production are recorded to track all the information about the installation along with the information about the data that have been used.
Every time a new step is performed for the installation, the new information are appended in the GitLab issue.
Deployment in the valid environment
The user (M+UVP) deploys the pipeline in the valid environment from the release branch using GitLab CI/CD (or ad-hoc deployment scripts using the commit ID to deploy).
Danger
Tags with version number are not used to deploy the code but only a commit ID. Indeed, a tag can be easily removed or moved in git thus it is not a reliable information for tracking. This is why commit ID are used for deployment.
At this stage, the current version under development, is deployed in /bioinfo/pipelines/foobar/valid and the file /bioinfo/pipelines/foobar/valid/version contains the commit ID that has been deployed.
Launch the operational testing using GitLab CI/CD
The user (M+UD) checks that the deployment with GitLab CI/CD is available for the GitLab repository. It requires the file
.gitlab-ci.ymlas defined in the template pipeline.In the
.gitlab-ci.ymlfile, the operational testing is implemented through different jobs which launch the pipeline twice during the Deployment in the valid environment and compare the results to ensure they are identical.If the operational testing fails (the bioinformatics pipeline does not work or is not reproducible), go back to the Step 1 - software development.
Test the version deployed in the valid environment
The user (M+UVP) tests the bioinformatics pipeline.
Development of corrections if needed
In most of the cases, the deployment in the valid environment is very simple and quick. However, it might be necessary to correct some bugs before the deployment in production. In that case:
The developer (D) checkouts and updates the release branch from the local workspace:
git checkout release
git status
git pull
git branch -vv
The developer (D) creates a local branch named release-id_version-user (e.g. release-version-1.2.3-phupe), the release-version is retrieved from the CHANGELOG file) and uses it for the developments:
git checkout -b release-id_version-user # change the id_version and user values
The developer (D) implements the corrections, tests the modifications and commits them (see Code writing for the details about the command lines).
The developer (D) temporarily pushes the local branch on the remote repository:
git push origin release-id_version-user # change the id_version and user values
The developer (D) deploys the code from the release-id_version-user branch either in a personal environment for testing or in the dev environment to perform unit, integration, system and regression testing.
Once the code validated, the developer (D):
creates a Create a Merge Request in Gitlab from the release-id_version-user branch on the release branch using the template
merge_request_template.md,selects the Milestone (see Track the issues related to the new version in a Milestone),
assigns the Merge request to a user with the Maintainer role.
The user (M+UVP) reviews and accepts the Merge Request.
The user (M+UVP) updates the release branch from the local workspace:
git checkout release
git status
git pull
git branch -vv
The user (M+UVP) go back to Deployment in the valid environment.
Add a tag with the version number
Once the new release has been validated and the installation in the valid environment is successful, the user (M+UVP) adds a tag (using the same version number that has been written in the CHANGELOG file) on the current HEAD:
tag-version4prod.sh -t version-1.2.3
git push --tags
Note
The script tag-version4prod.sh checks that the tag name is consitent with what was mentioned in the CHANGELOG and add the tag.
Step 4 - production deployment
Update the local repository with the version to deploy
It is likely that the local repository is not up-to-date anymore especially if a Merge Request has been submitted on GitLab. The user (M+UVP) updates the local workspace:
git checkout release
git status
git pull
git branch -vv
Deployment in the prod environment
The user (M+UVP) deploys the bioinformatics pipeline in the prod environment from the release branch using GitLab CI/CD (or ad-hoc deployment scripts using the commit ID to deploy). The deployment is only based on a commit ID. The last commit ID from the release branch must be deployed.
Danger
Tags with version number are not used to deploy the code but only a commit ID. Indeed, a tag can be easily removed or moved in git thus it is not a reliable information for tracking. This is why commit ID are used for deployment.
At this stage, the current version under development, is deployed in /bioinfo/pipelines/foobar/prod and the file /bioinfo/pipelines/foobar/prod/version contains the commit ID that has been deployed.
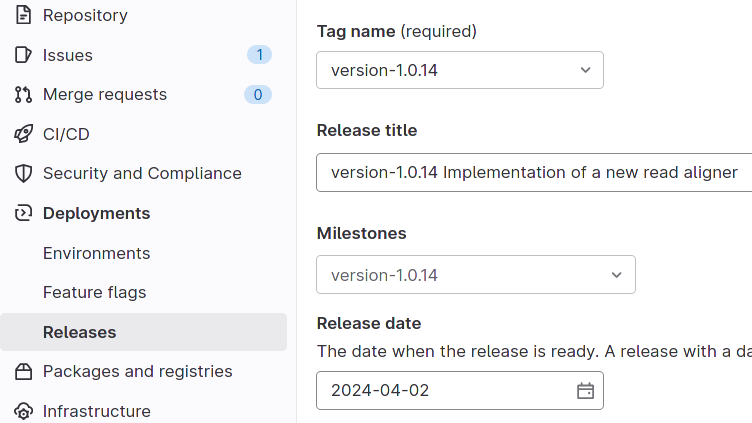
Create a new release
The user (M+UVP) creates a New release in GitLab:
Select the Tag name corresponding to the new release
Fill in the Release title with the version number followed by free comments
Select the Milestone corresponding to the new release
Schedule an operational testing in GitLab CI/CD
The user (M+UD) checks that the deployment with GitLab CI/CD is available for the GitLab repository. It requires the file
.gitlab-ci.ymlas defined in the template pipeline.In the
.gitlab-ci.ymlfile, the operational testing is implemented through different jobs which launch the pipeline twice during the Deployment in the prod environment and compare the results to ensure they are identical.The user (M+UD) connects to GitLab to Schedule an operational testing periodically in GitLab CI/CD if it is not yet scheduled.
Bring the content of the release branch into the main branch
At this stage, there is a stable code on the release branch that has been tested, validated and successfully installed in the prod environment.
The user (M+UVP) checkouts and updates the main branch:
git checkout main
git status # everything must be cleaned
git pull
git branch -vv
The user (M+UVP) brings the content of the release branch into the main branch using the option
--no-ffto avoid the fast-forward mode. This option will produce a new commit ID with a specific message to describe and track the merge:
git merge --no-ff release # can be a bit verbose
git status # must be cleaned
git branch -vv
The
git statusmust absolutely says something like this (otherwise, ask for help before moving forward):
# On branch main
# Your **branch is ahead of 'origin/main' by** 113 commits.
# (use "git push" to publish your local commits)
#
# nothing to commit, working directory clean
The user (M+UVP) pushes the modifications on the remote repository:
git push origin main
Bring the content of the release branch into the hotfix branch
At this stage, there is a stable code on the release branch that has been tested, validated and successfully installed in the prod environment and merged with the main branch.
The user (M+UVP) checkouts and updates the hotfix branch:
git checkout hotfix
git status # must be cleaned otherwise, commit or stash your modifications
git pull
git branch -vv
The user (M+UVP) brings the content of the release branch into the hotfix branch using the option
--ff-onlyto only use the fast-forward mode in order to have the exact same commit ID between the release branch and the hotfix branch:
git merge --ff-only release # always us the options --ff-only
git status # must be clean
git branch -vv
The
git statusmust absolutely says something like this (otherwise, ask for help before moving forward):
# On branch main
# Your **branch is ahead of 'origin/main' by** 113 commits.
# (use "git push" to publish your local commits)
#
# nothing to commit, working directory clean
The user (M+UVP) pushes the merge on the remote repository.
git push origin hotfix
Bring the content of the release branch into the devel branch
At this stage, there is a stable code on the release branch that has been tested, validated and successfully installed in the prod environment and merged with the main and the hotfix branches.
This step is necessary if some commits have been done on the release branch (this occurs only if there was a Development of corrections if needed).
The user (M+UVP) checkouts and updates the devel branch:
git checkout devel
git status # must be cleaned otherwise, commit or stash your modifications
git pull
git branch -vv
The user (M+UVP) brings the content of the release branch into the devel branch:
git merge --no-ff release # may be verbose
git status # may say something
git branch -vv
If the devel branch has been modified in the meantime, git will try to merge the modifications from the release branch.
If some files cannot be merged automatically, they will appear to have conflicts in the output of the
git status:
# On branch devel
# You have unmerged paths.
# (fix conflicts and run "git commit")...
# (use "git add ..." to mark resolution)
# both modified:build.xml
The conflicts have to be resolved manually. In that case, ask the help from the other developers.
The files with resolved conflicts must be added to the staging area, committed, and the merge must be sent on the remote repository:
git push origin devel
The user (M+UVP) closes:
all the GitLab issues which have been opened including the
, the , and all issues related to the new versionthe milestone (see Track the issues related to the new version in a Milestone)
Back on the devel branch
For security reason, the user (M+UVP) switches on the devel branch to avoid any risk of code modification on the main branch:
git checkout devel
git pull
git branch -vv
Graphical synopsis of the procedure